Background & functionality
Perhaps you have also asked yourself how it is possible to use the integrated graphics processor (iGPU) from Intel, which is often integrated into notebooks, for AI applications. Under Windows 111 in conjunction with WSL22 and the model server OpenVINO3 based on the container management environment Podman4, this is relatively easy to implement. This article describes the necessary steps to finally enable communication with a Large Language Model. The “DeepSeek-R1-Distill-Qwen-7B”5 model is used to show how this can be done securely locally. After following the steps shown, it is possible to communicate with the model via “Chat Completions” based on the OpenAI API6.
The following features are supported:
- Secure local use of Large Language Models (LLMs) within the WSL2 environment
- Local operation of the OpenVINO5 model server based on container virtualization with Podman6
- Use of the local iGPU from Intel for inference of the model within the container
- Local prompts to the “DeepSeek-R1-Distill-Qwen-7B” model
Prerequisites
- At least Windows 11 is installed
- WSL2 must be activated in Windows 11
-
→ A WSL2 Linux distribution is installed
- Steps 1-3 have already been completed
Steps
-
Start the installed subsystem
- within the Windows command prompt -
- Press the Windows-Key + R-Key key combination
- Enter cmd in the small window and confirm with the Return-Key or click OK.
- Start system
wsl -d mylinux - Notes:
- The Windows command prompt changes to the Terminal of the Linux distribution
- The distribution name “mylinux” was defined in a previous article, see → 3. prerequisite
-
Update distribution
- within the terminal of the Linux distribution -
- Update APT repositories and packages
sudo apt update && sudo apt upgrade -y
- Update APT repositories and packages
-
Install the Intel GPU drivers
- within the terminal of the Linux distribution -
-
Add key of the APT repository for Intel graphics drivers
sudo wget -qO - https://repositories.intel.com/gpu/intel-graphics.key | sudo gpg --yes --dearmor --output /usr/share/keyrings/intel-graphics.gpg -
Add APT repository
sudo echo "deb [arch=amd64,i386 signed-by=/usr/share/keyrings/intel-graphics.gpg] https://repositories.intel.com/gpu/ubuntu noble unified" | sudo tee /etc/apt/sources.list.d/intel-gpu-noble.list -
Update APT repositories and install drivers
sudo apt update && sudo apt install -y libze-intel-gpu1 intel-opencl-icd clinfo -
Optional: Add user to render group
- In case the currently logged in user is NOT “root” (check via “whoami” command) -
sudo gpasswd -a ${USER} render -
Check whether GPU is recognized correctly
clinfo | grep "Device Name"- The resulting output should look like this
Device Name                                       Intel(R) Graphics [0x7d45]
    Device Name                                   Intel(R) Graphics [0x7d45]
    Device Name                                   Intel(R) Graphics [0x7d45]
    Device Name                                   Intel(R) Graphics [0x7d45]
- The resulting output should look like this
-
-
Prepare the model
- within the terminal of the Linux distribution -
- Install Python Manager for virtual environments
sudo apt install -y python3.12-venv - Create a virtual Python environment
python3 -m venv ~/venv-optimum-cli - Activate virtual Python environment
. ~/venv-optimum-cli/bin/activate - Install the Optimum CLI
python -m pip install "optimum-intel[openvino]"@git+https://github.com/huggingface/optimum-intel.git@v1.22.0 - Download the model and perform the quantization
optimum-cli export openvino --model deepseek-ai/DeepSeek-R1-Distill-Qwen-7B --weight-format int4 ~/models/deepseek-ai/DeepSeek-R1-Distill-Qwen-7B - Deactivate virtual Python environment
deactivate - Create model repository configuration
tee ~/models/config.json > /dev/null <<EOT { "mediapipe_config_list": [ { "name": "deepseek-ai/DeepSeek-R1-Distill-Qwen-7B", "base_path": "deepseek-ai/DeepSeek-R1-Distill-Qwen-7B" } ], "model_config_list": [] } EOT - Create MediaPipe graph for HTTP inference
tee ~/models/deepseek-ai/DeepSeek-R1-Distill-Qwen-7B/graph.pbtxt > /dev/null <<EOT
input_stream: "HTTP_REQUEST_PAYLOAD:input"
output_stream: "HTTP_RESPONSE_PAYLOAD:output"
node: {
    name: "LLMExecutor"
    calculator: "HttpLLMCalculator"
    input_stream: "LOOPBACK:loopback"
    input_stream: "HTTP_REQUEST_PAYLOAD:input"
    input_side_packet: "LLM_NODE_RESOURCES:llm"
    output_stream: "LOOPBACK:loopback"
    output_stream: "HTTP_RESPONSE_PAYLOAD:output"
    input_stream_info: {
        tag_index: 'LOOPBACK:0',
        back_edge: true
    }
    node_options: {
        [type.googleapis.com / mediapipe.LLMCalculatorOptions]: {
            models_path: "./",
            plugin_config: '{ }',
            enable_prefix_caching: false,
            cache_size: 2,
            max_num_seqs: 256,
            device: "GPU",
        }
    }
    input_stream_handler {
        input_stream_handler: "SyncSetInputStreamHandler",
        options {
            [mediapipe.SyncSetInputStreamHandlerOptions.ext] {
                sync_set {
                tag_index: "LOOPBACK:0"
                }
            }
        }
    }
}
EOT
- Install Python Manager for virtual environments
-
Install the container management environment
- within the terminal of the Linux distribution -
- Install Podman
sudo apt install -y podman
- Install Podman
-
Deploy the model server
- within the terminal of the Linux distribution -
- Download OpenVINO image and run container
podman run -d --name openvino-server --device /dev/dri/card0 --device /dev/dri/renderD128 --device /dev/dxg --group-add=$(stat -c "%g" /dev/dri/render*) --group-add=$(stat -c "%g" /dev/dxg) --rm -p 8000:8000 -v ~/models:/workspace:ro -v /usr/lib/wsl:/usr/lib/wsl docker.io/openvino/model_server:2025.0-gpu --rest_port 8000 --config_path /workspace/config.json
- Download OpenVINO image and run container
-
Test the model server
- within the terminal of the Linux distribution -
- Request configuration endpoint of the OpenVINO server
curl http://localhost:8000/v1/config- The response of the request should look like this:
{
"deepseek-ai/DeepSeek-R1-Distill-Qwen-7B": {
    "model_version_status": [
    {
        "version": "1",
        "state": "AVAILABLE",
        "status": {
        "error_code": "OK",
        "error_message": "OK"
        }
    }
    ]
}
- The response of the request should look like this:
- Request configuration endpoint of the OpenVINO server
-
Communicate with the model
- within the terminal of the Linux distribution -
- Save simple Python-based chat tool for demo purposes
tee ~/ovchat.py > /dev/null <<EOT import requests, json, readline USER_COLOR, ASSISTANT_COLOR, RESET_COLOR = "\033[94m", "\033[92m", "\033[0m" LOCAL_SERVER_URL = 'http://localhost:8000/v3/chat/completions' def chat_with_local_server(messages): response = requests.post(LOCAL_SERVER_URL, json={"model": "deepseek-ai/DeepSeek-R1-Distill-Qwen-7B", "messages": messages, "stream": True}, stream=True) if response.status_code == 200: for line in response.iter_lines(): if line: try: raw_data = line.decode('utf-8') if raw_data.startswith("data: "): raw_data = raw_data[6:] if raw_data == '[DONE]': break json_data = json.loads(raw_data) if 'choices' in json_data: message_content = json_data['choices'][0]['delta'].get('content', '') if message_content: print(ASSISTANT_COLOR + message_content + RESET_COLOR, end='', flush=True) except json.JSONDecodeError as e: print(f"JSON-Error: {e}") except Exception as e: print(f"Exception: {e}") else: print(f"Fehler: {response.status_code} - {response.text}") def main(): messages = [{"role": "system", "content": "You're a helpful assistent."}] print("Type 'exit' quitting.") while True: user_input = input(USER_COLOR + "\nYou: " + RESET_COLOR) if user_input.lower() == 'exit': break messages.append({"role": "user", "content": user_input}) print(ASSISTANT_COLOR + "Assistent: " + RESET_COLOR, end=' ') chat_with_local_server(messages) if __name__ == "__main__": main() EOT - Chat with the model
python3 ~/ovchat.py
- Save simple Python-based chat tool for demo purposes
-
Verify GPU utilization
- within the Windows command prompt -
- Press the Windows-Key + R-Key key combination
- Enter taskmgr in the small window and confirm with the Return-Key or click OK.
- Switch to the “Performance” tab
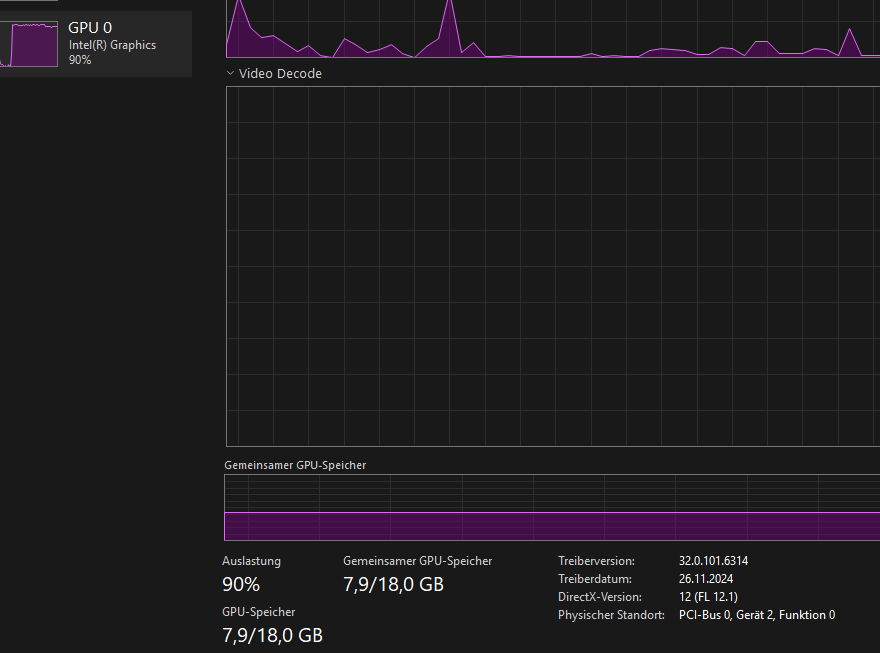
- During communication with the model, the diagram should show a clear utilization of the GPU:

- During communication with the model, the diagram should show a clear utilization of the GPU:
References
- ↗ https://dgpu-docs.intel.com/driver/client/overview.html
- ↗ https://docs.openvino.ai/2025/get-started/install-openvino/configurations/configurations-intel-gpu.html
- ↗ https://huggingface.co/docs/optimum/main/en/intel/openvino/export
- ↗ https://docs.openvino.ai/2025/model-server/ovms_docs_deploying_server_docker.html
- ↗ https://docs.openvino.ai/2025/model-server/ovms_docs_mediapipe.html
- ↗ https://github.com/openvinotoolkit/model_server/blob/main/docs/llm/reference.md
- ↗ https://ai.google.dev/edge/mediapipe/framework/framework_concepts/graphs
